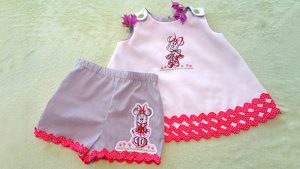
See a different side of fashionista Minnie Mouse as she celebrates her 60th birthday. Her traditional wardrobe of white, black and red polka dots are made more contemporary in white, grey and hot pink with polka dots. This fun little outfit would be fun and comfortable for a trip to Disney World or Disneyland. THE Dream Machine has features such as the laser for straight seams and accessory feet such as stitch-in-the-ditch and side cutter. The embroidery on the shorts was done with THE Dream Machine and the Brother Quattro applique functions because the gingham is too lightweight for a dense design.
Requirements:
- Toddlers’ Tent Tops, Dresses and Shorts (A pullover top and dress that have forward shoulder button and buttonhole front closures)
- Fabric: 1 yd. white twill, 7/8 yd. gray gingham
- Notions: Threads: sewing, embroidery, monofilament, 5/8 yd. of ½” elastic, 5 yds. ruffled rick rack, 2 yds. piping, tearaway and heavy water soluble stabilizer
- Machines: Brother Quattro or THE Dream Machine, 5×7 frame
- iBroidery Designs: MMUP04 plus shirt floral border, MMUP05 plus shorts floral border
Shirt Floral Boder.pes
Shorts Floral Border.pes
Top
- Cut one front and one back, both on the fold. Transfer all marks for matching points, buttons and buttonholes. Make vertical center crease with iron and measure down 4.5″ to mark placement for center of Minnie design.
- Open MMUP04. Add top floral border directly below, nestling Minnie’s shoes and the Disney copyright as close to the floral border as possible.
- Embroider MMUP04 + top floral border.

- Seam front to back on one side with 5/8″ seam allowance. Use THE Dream Machine laser to guide your stitching. Finish seam with zig zag, serge, or French seam.

- Sew hemline by machine with one side seam still open.

- Apply piping around entire top, from underarm to the opposite underarm. Save time and aggravation by using your knee lift. Take care to clip curves every ¼-3/8″.
- Apply rick rack so that the bottom peak extends beyond the finished hem edge. Add two more rows of rick rack just above the first. This covers the machine stitched hem.

- Stitch open side seam and finish in same manner as other side seam.
- Cut lining from gray gingham. Stitch side seams as indicated in pattern guide sheet. Serge or finish bottom edge as directed in pattern or any way you like.
- Seam facing to neckline. Trim seam and clip curves. Tack facing to underarm seams.
- Stitch buttonholes and sew on buttons. Top is finished.
Shorts
- Cut out two fronts and 2 backs. Trim 1″ from shorts hemline on all shorts pieces. The 1 ¼” hem seam allowance has been reduced to ¼”.
- Seam one front to one back as directed in guide sheet.
- Mark placement of embroidery on one front. Size 4 placement is 3 ½” from hemline and 3 ½” from the side. Smaller sizes may require different measurements.
- Open design MMUP05. Add shorts floral border, again snugging the border as closely as possible to the feet and Disney copyright. See image 7 below.
- Assemble shorts as indicated on pattern guide sheet. Leave the crotch unstitched.
- Finish hemline with serged edge or zig zag. Press up ¼” to inside and stitch in place.
- Join rick rack with monofilament thread to hemline. Position so that the peaks hang below the finished edge, as on the shirt.

- Seam the crotch, catching the rick rack in the seam. Trim and finish seam.
- Serge or zig zag the top of shorts. Press crease 1″ from finished edge.
- Create a header in the casing by stitching a scan 1/8″ from the fold. By moving the needle 5 tics from center, the edge stitch/stitch in the ditch foot makes easy work of this.

Stitch down casing and insert elastic as instructed in guide sheet.
Press, present to a little girl and expect a big smile.

